Updating Our Home: Exterior Front Entry
This has been a long time coming, and it was so needed! Nothing extreme (I'm still dying to check "new front porch" off my home improvement wishlist), but an example of how small changes can make a big impact on overall aesthetic (and personal happiness).
I wish I had a photo of what our home looked like on the day we moved in. I'm sure I could dig one up somewhere, but it's probably on 35mm film in an old photo album for all I know! It had tacky late 90's era brass lights flanking our beat up front door with a half circle window. The landscaping was atrocious, with no thought to symmetry or growing conditions. Everything about the home screamed "builder grade". We were oblivious and deliriously happy to be new homeowners!
Before: This was taken just a couple years after moving in... we had painted front door white (some wear and tear shown here, though) and bought new lights, but it still looked so sad! The door frame was so chipped, threshold broken and the numbers outdated. The mat is at least colorful, but too small.
Painting the interior made it so much happier!
The honey-do list was turning into a novel but over the past eight years we have checked off numerous improvement projects; sometimes more than we knew we needed. We've learned to save up for the big things and take care of projects one at a time, even though we want our vision to come to life as quickly as possible. I scour Pinterest and magazines for inspiration and look to DIY sites and YouTube videos for anything we can accomplish on our own. That's how I came to change the house numbers on display, and I will share those details in a bit. We still have a ways to go (ahem, I apologize to our neighbors for the landscaping still to be moved.) The only reason those shrubs are still in place: we need something to hold up the Christmas lights!
A new front door can make all the difference in transforming your space.
Here are some easy updates you can do to make a big improvement:
- Get a new front door. This can also help with energy efficiency, reducing heat and air conditioning leaks. If you can't afford to get a new door, install new weatherstripping and paint both the interior and exterior a new, happy color.
- Install new lighting. This instantly makes your home look less dated. Keep the glass clean and change bulbs as soon as they blow out. This is a tip I picked up from real estate friends. They claim it helps your home to appear more inviting and taken care of.
- Add landscaping where you can. Visit local nurseries to see what grows best in your area. Be sure to take note of how much sun that particular area gets during each time of the day, as well as what kind of soil you have and how well it drains. Look around a few different retailers for the best price (it's a bonus if they have a one-year guarantee on trees and shrubs). Get inspiration from nearby gardens and magazines to see what sort of colors or flowers you like best. Flowers don't have to be permanent, you can always pull them out a few years later if you aren't satisfied. Try not to uproot trees and shrubs though, as they can become damaged and not transplant easily.
- Add potted plants or chairs to your front porch. Even if you only have a small stoop, a potted plant with seasonal flowers will always look welcoming.
- Update the hardware on your home such as house numbers, doorbells, handsets and locks. We upgraded to a touchpad deadbolt that we can access and monitor from our cell phones. I never have to worry about the kids (or myself) being locked out of the house again! Even if we are on vacation and our neighbor graciously agrees to feed the pets or water the plants for us, we can give them a temporary access code and delete it once we return home. This was a great investment!
- Lastly, change your doormat! I like to change ours with the season. It can get very ratty looking with six family members crossing over the threshold multiple times each day. Sometimes it's a brightly colored mat, others just have a simple saying like "welcome" or "hello". Also, err on the side of too large rather than too small. A substantial landing area makes everything appear more bountiful by comparison.
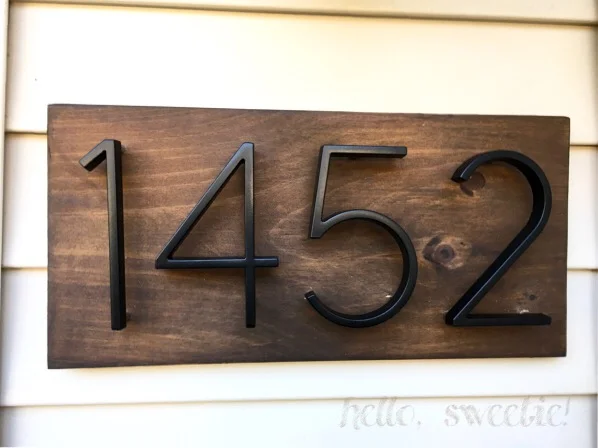
Of course, you can get more elaborate depending on your budget and know-how. One day we would love to have some masonry work done and perhaps bump out the front of the house for a proper covered entry. Stacked stone on the lower half of our home (that currently is only grey cement block) is at the top of our wish list too! That is well beyond what I'm capable of at the moment, but that's what brings me to my next project: house numbers. This was very simple to accomplish in a weekend. It probably could've been done in a day if I'd started early enough to let the stain dry. It was such a small change, but I love the outcome!
An easy project for house number display | hello, sweetie!
We began by purchasing a simple piece of pine plank at Home Depot. I chose an 8 inch height since my numbers were already so tall. I think the total cost for the board was about seven dollars. We cut the board to fit the size we were going to hang it in. I planned approximately a 2 inch margin on both sides.
Next, I sanded the board and wiped it down with a damp (not wet) cloth. You don't want to saturate the wood, just keep the pores/grain (is that a real thing?) open, allowing the stain to penetrate. We chose this particular brand of stain knowing our front door gets a lot of afternoon sun, plus we wanted it to hold up to snow and rain. Just one coat seemed a bit to orange for my liking, so I used two very light coats. It was applied with a wide sponge brush and allowed time to dried thoroughly after each coat.
Use a stain that protects as well as looks great!
Try just one coat and let it dry before adding the second coat. It can get too dark very quickly.
I followed the directions on the packaging for attaching the numbers, which turned out to be fairly easy despite my skepticism. However, I used a smaller drill bit than was suggested; I felt if I'd used the larger recommended one, the hardware would've just slipped right through. Maybe I'm crazy but this worked out for me! That whole process only took about 10 minutes.
Then we used picture hanging hardware to attach the new plank onto our siding. Within two minutes there was a pretty severe flash storm with high winds. It proved to be a great test of durability. Lo and behold it held up! I love the way it turned out! In all honesty, it might be a bit difficult to see the contrast between the hardware and the stained plank, but I really did not want to use an aluminum or chrome finish. I love the look of the iron/oil rubbed bronze, plus it matched our light fixtures and door handle.
Before & After: just a few updates to our front entryway | hello, sweetie!
As you can see we still have a long way to go; that concrete slab that's crumbling in the corner is atrocious! I can't wait to rip out what's left of the fall mums and plant some dwarf spruce trees in the large pots for Christmas! (By the way, has anyone seen the new entry rugs at Target for the holiday? Super cute!) Here are a few other favorites I've come across.
I'd love to see what you have done with your space too. If you end up using any of these tips, be sure to tag me on Instagram @hellosweetiebakes! Seeing photos of my friends homes really brightens my day. Best of luck, homeowners!


